Page Layout
Last updated
Page layout sets how a document sits on paper. It covers page size, margins, columns, headers and footers, page numbers, and page breaks. Word and PDF exports use the same settings. A document can have one layout throughout, or be split into sections with their own layout.
The Layout tab
Page setup is on the Layout tab of the ribbon. The tab is unavailable in documents you can only view.

| Button | What it does |
|---|---|
| Page Layout | Opens the Page Layout dialog: page size, orientation, margins, columns, spacing, borders, page numbers, line numbers, hyphenation, and pageless mode. |
| Headers & Footers | Opens the Headers & Footers dialog. |
| Watermark | Opens the Watermark dialog. |
| Page Break | Starts a new page at the cursor. |
| Section Break | Starts a new section on a new page. |
| Continuous | Starts a new section on the same page. |
Page size, orientation, and margins
- Click Page Layout on the Layout tab.
- Change the settings.
- Click Apply. Cancel closes the dialog without changes.
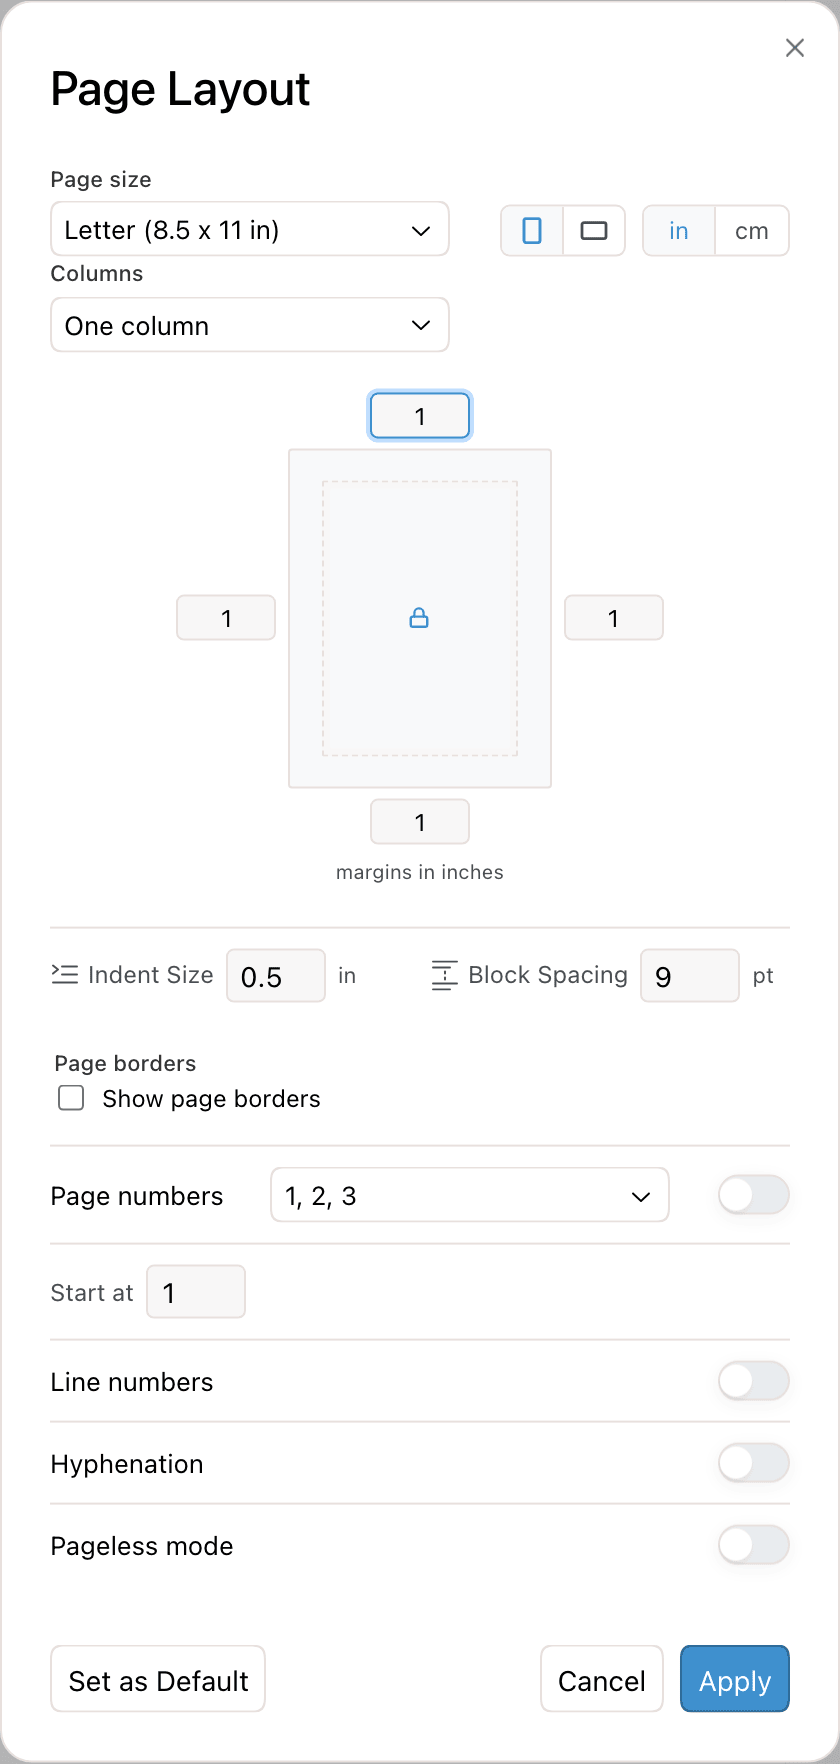
| Setting | Options |
|---|---|
| Page size | Letter (8.5 x 11 in) is the default. The menu also has Tabloid, Legal, Statement, Executive, Folio, A3, A4, A5, B4, and B5, each with its dimensions. |
| Orientation | Portrait or Landscape: the two page buttons next to the page size. |
| Units | in or cm. Switching converts the values shown in the dialog. |
| Margins | The four fields around the page preview. Each is 0 to 3 inches (7.62 cm). The default is 1 inch. |
| Margin lock | The lock in the middle of the preview. While it is locked (the default), typing in one margin field sets all four. Click it to set each side separately. |
The preview updates as you change the size, orientation, margins, and columns.
Paged vs. pageless
A document is shown either as separate pages or as one continuous page with no page breaks. Paged view is the default. To switch, open Page Layout, turn Pageless mode on or off, and click Apply.
Pageless mode hides headers, footers, page numbers, page borders, watermarks, line numbers, and columns, and page breaks have no effect. The settings are kept and come back in paged view. While pageless mode is on, the dialog disables the page number, line number, and page border controls.
Pageless mode applies to the whole document. PDF export always produces pages, using the page size and margins.
Paragraph spacing and indent size
Two spacing settings in the Page Layout dialog apply to the whole document:
| Setting | What it sets | Default | Range |
|---|---|---|---|
| Indent Size | The width of one indent step, used by Increase Indent and Tab. | 0.5 in | 0.125 to 2 in |
| Block Spacing | The space after each paragraph and other block, in points. | 9 pt | 0 to 144 pt |
Paragraphs with their own spacing, such as paragraphs imported from Word, keep it. Line spacing is set per paragraph on the Edit tab.
Default layout for new documents
Set as Default in the Page Layout dialog saves the current settings as the layout for your new documents. Pageless mode is included. The button reads Saved when the default is stored and Retry Save Default if saving failed. Existing documents don't change. The button requires an account and appears only when the dialog applies to the entire document.
Page breaks
A page break moves the text after the cursor to the top of the next page. To insert one, use any of these:
- Page Break on the Layout tab
- ⌘Enter (see paragraph shortcuts)
- Right-click, then Insert > Page Break
A break shows as a small double-line marker after the last word before it. The marker is not printed or exported. Breaks go in the document body only, not in a header, footer, or note.
Sections and section breaks
A section break splits the document into sections. Each section has its own page size, orientation, margins, columns, page numbering, page borders, and headers and footers. There are two kinds:
| Ribbon button | Right-click menu | Next section starts |
|---|---|---|
| Section Break | Insert > Section Break (Next Page) | On a new page |
| Continuous | Insert > Section Break (Continuous) | On the same page. Use it to change the number of columns partway down a page. |
A new section starts with the layout of the section it was split from. To change one section:
- Put the cursor in the section.
- Click Page Layout. Apply to appears at the top when there is more than one section. It starts on the current section, for example Section 2 (current).
- Change the settings and click Apply.
Choose Entire document in Apply to to give every section the same settings. Pageless mode and Set as Default appear only for the entire document. The Headers & Footers dialog has the same Apply to menu. For how Word section breaks import, see Word compatibility.
Columns
Text can flow in one, two, or three columns per section. Choose One column, Two columns, or Three columns under Columns in the Page Layout dialog. Columns are equal width, with a 0.5-inch gap.
To put columns on part of a page, such as a one-column title above a two-column body:
- Put the cursor at the start of the text that goes in columns and click Continuous.
- To return to one column after it, put the cursor where the columns end and click Continuous again.
- Put the cursor in the middle section, open Page Layout, choose the number of columns, and click Apply.
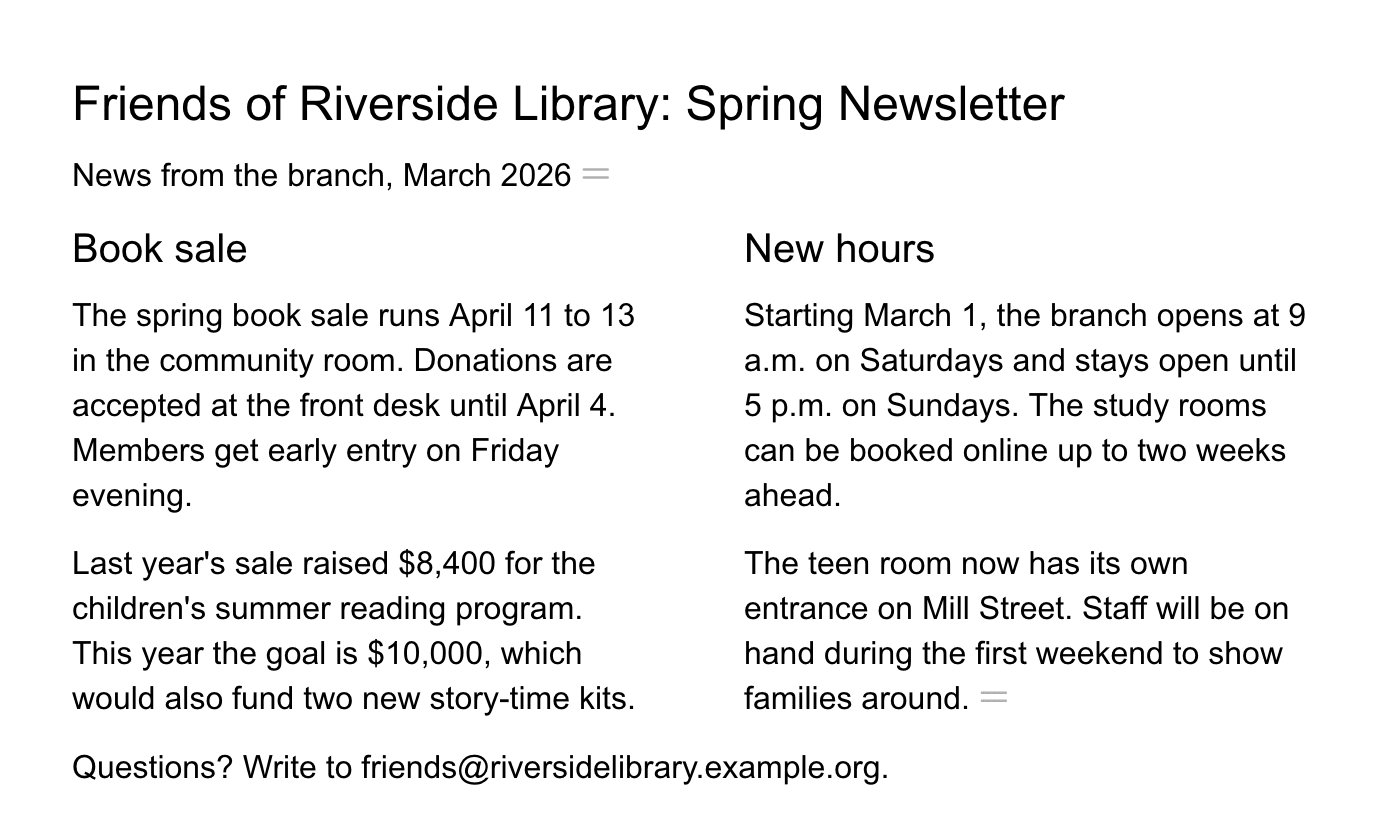
Text fills a column to the bottom of the page before it continues in the next column. On a section's last page, the columns are balanced to equal length only when the section ends with a continuous break. At the end of the document or before a next-page break, the last column can be shorter. This matches Word. To balance the columns at the end of a document, end the section with a continuous break.
A Word document with more than three columns keeps its column count. The Columns menu shows it as, for example, 4 columns (imported).
Headers and footers
Every page has a header band in the top margin and a footer band in the bottom margin. Each band has three zones: left, center, and right.
Edit on the page
- Double-click the top or bottom margin of a page. The zones appear as outlined boxes, and the cursor goes into the zone you clicked. A single click in the margin does nothing.
- Type. Formatting from the Edit tab, such as fonts and bold, works in the zones. Press Tab to move to the next zone.
- Click in the body text to stop editing the header or footer.
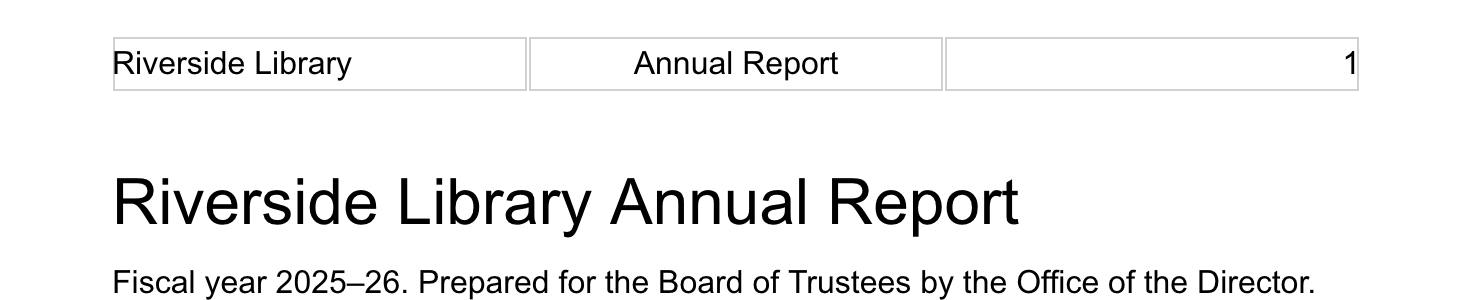
The Headers & Footers dialog
Click Headers & Footers on the Layout tab to edit both bands as text fields. Type {PAGE} for the page number and {PAGES} for the page count, for example Page {PAGE} of {PAGES}. Click Apply to save.
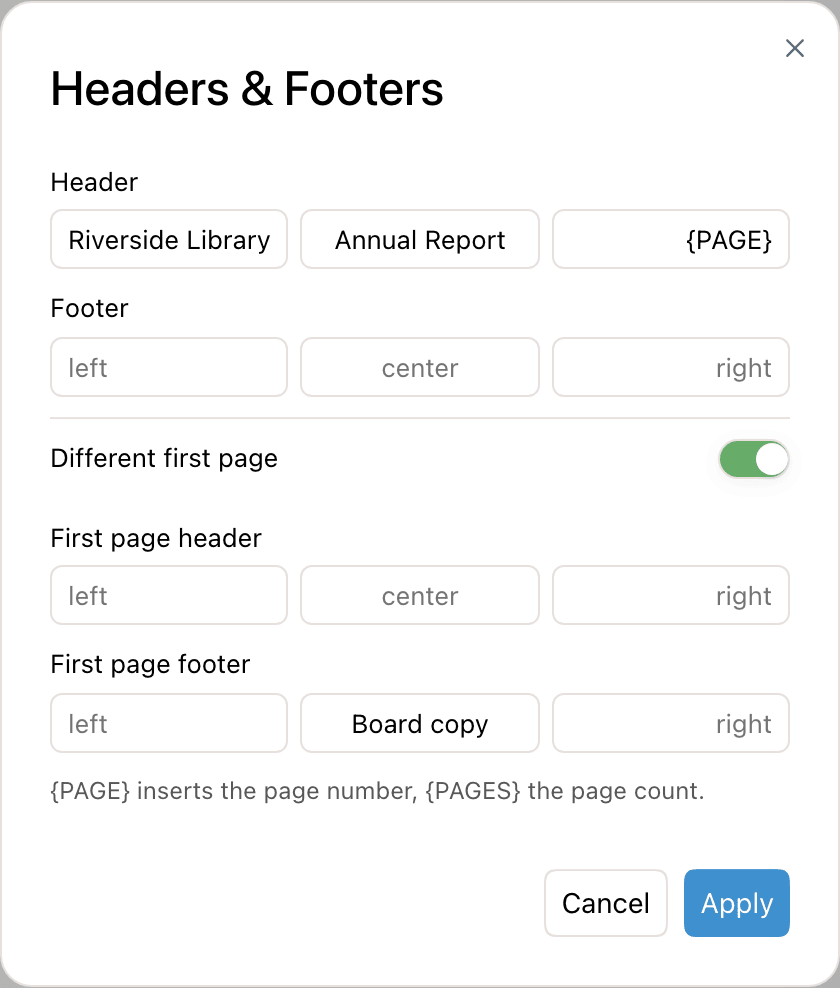
| Option | Effect |
|---|---|
| Header, Footer | Left, center, and right text for every page. |
| Different first page | Adds First page header and First page footer, used on the first page only. Leave them empty for a blank first page, such as a title page. |
| Apply to | In a document with more than one section, sets headers and footers for the entire document or for one section. |
Different headers and footers for even pages come from Word documents or from the agent. They are shown and exported, but the dialog doesn't edit them, and saving the dialog leaves them unchanged. The agent can write headers, footers, and page numbers from a plain request, including even-page versions.
Page numbers
A page number is a live field in a header or footer. It shows the number of the page it is on. To add one, use any of these:
- Turn on the Page numbers switch in the Page Layout dialog. This adds a page number to the right zone of the header. Turning the switch off removes it. Other header text is not changed.
- While editing a header or footer zone, click Page # on the Insert tab. Use this for a number in another zone or in the footer.
- Type
{PAGE}in the Headers & Footers dialog.
| Setting | Options |
|---|---|
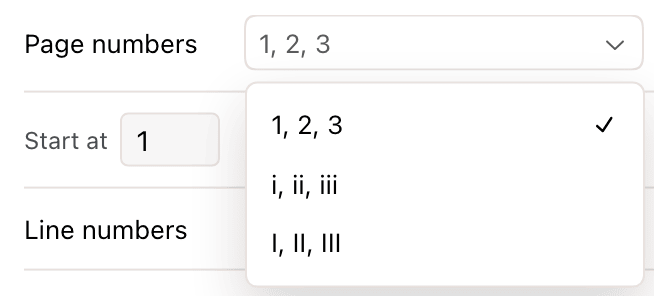
| Format | The menu next to Page numbers: 1, 2, 3 (the default), i, ii, iii, or I, II, III. Set per section. |
| Start at | The first page number, from 1 to 99999. For the entire document, this is the number of page 1. |
| Restart page numbering | Shown when Apply to is a section. On, the section starts over at its Start at number. Off, it continues from the previous section. |
For Roman numerals on front matter and 1, 2, 3 after it, add a Section Break after the front matter. Set section 1 to i, ii, iii. Set section 2 to 1, 2, 3, turn on Restart page numbering, and set Start at to 1. Roman numerals cover pages 1 to 3999. Higher pages show as numbers.
The switch always uses the top right corner. For another position, insert the number with Page # in that zone, or ask the agent.
Page borders
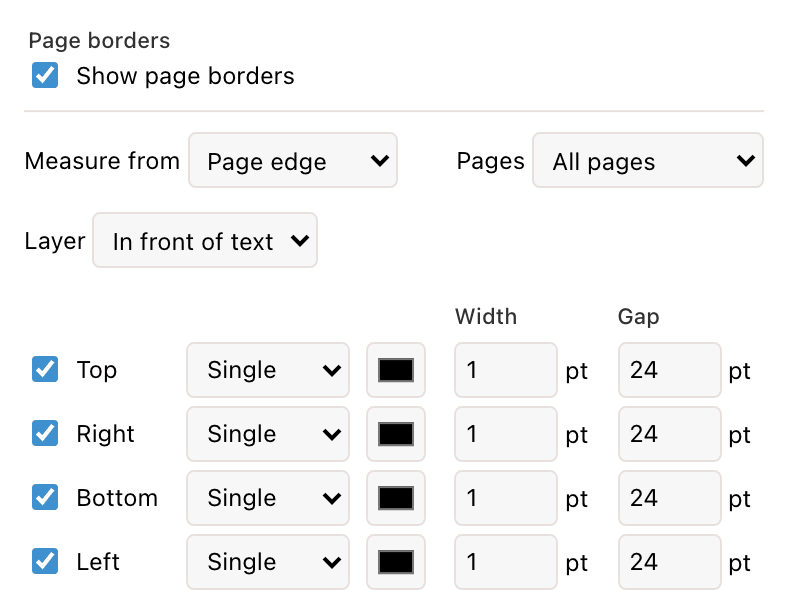
Turn on Show page borders in the Page Layout dialog to draw a border on each page. It starts as a 1 pt black single line on all four sides, 24 pt from the page edge.
| Control | Options |
|---|---|
| Measure from | Page edge or Text margins: where the gap is measured from. |
| Pages | All pages, First page only, or All except first. |
| Layer | In front of text or Behind text. |
| Each side | A checkbox to show the side, and a style: Single, Double, Dotted, or Dashed. Then a color, a width from 0.25 to 12 pt, and a gap from 0 to 31 pt. |
Borders are set per section. A Word page border in a style Revise can't draw, such as an art border, is kept for DOCX export. The dialog notes this and offers Remove.
Watermarks
A watermark is faint text behind every page, such as DRAFT. Click Watermark on the Layout tab to add or change it.
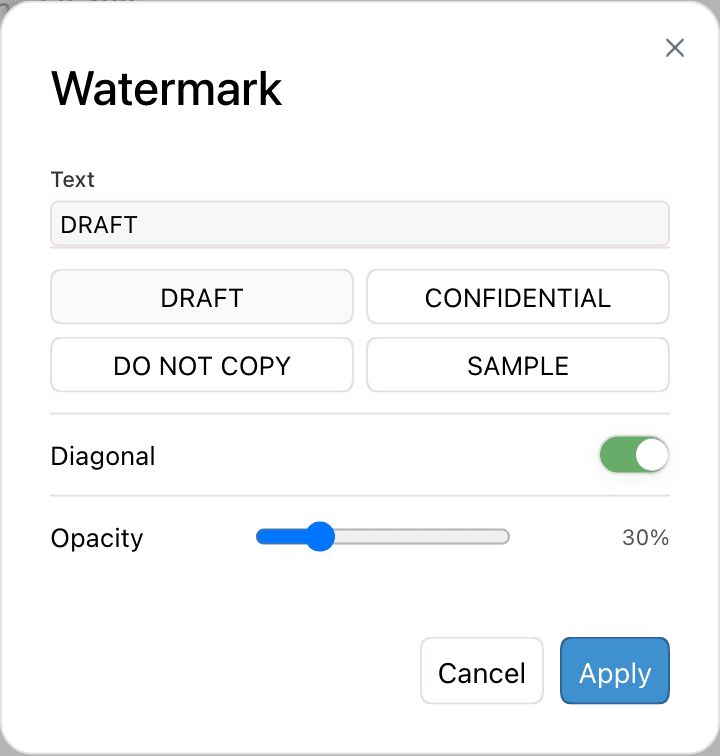
- Text: any text, or a preset: DRAFT, CONFIDENTIAL, DO NOT COPY, or SAMPLE.
- Diagonal: on (the default), the text runs across the page diagonal. Off, it is horizontal.
- Opacity: 10% to 100%. The default is 30%.
A watermark applies to the whole document. To delete it, open the dialog and click Remove.
Line numbers and hyphenation
Line numbers in the Page Layout dialog numbers every line in the left margin, as on legal pleading paper. When it is on, a menu sets when the count starts over: Restart each page (the default), Restart each section, or Continuous.
Hyphenation splits words with a hyphen at line ends. It uses English hyphenation rules and is off by default.
Keep with next, keep lines together, and widow control
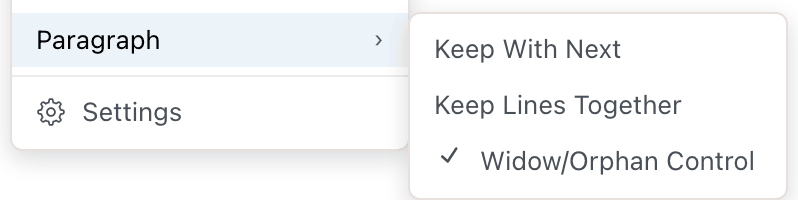
Three options control how a paragraph breaks across pages. Right-click the paragraph and open Paragraph. A check mark shows each option that is on. Click an option to turn it on or off.
| Option | Effect | Default |
|---|---|---|
| Keep With Next | The paragraph stays on the same page as the start of the next one. | Off. Headings always behave as if it were on. |
| Keep Lines Together | The paragraph is never split across pages. If it doesn't fit, the whole paragraph moves to the next page. | Off |
| Widow/Orphan Control | No single line of the paragraph is left alone at the bottom or top of a page. | On |
The submenu appears when the cursor is in a body paragraph and you can edit. The options have no effect in pageless mode. Word documents keep these settings on import and export. Word's "page break before" option has no equivalent: on import it becomes a page break before the paragraph.
Layout presets and the agent
The AI agent can change every setting on this page, for the whole document or one section. It also has one preset, APA 7th edition. Ask for APA format to get:
- Letter paper, portrait, 1-inch margins on all sides
- 0.5-inch indent size and no block spacing
- Page numbers in the top right corner, starting at 1
- Paged view
The preset changes page layout only, not fonts or line spacing. The agent applies layout changes directly, not as suggestions. External agents connected through the MCP server have the same settings and preset.
Export to Word and PDF
When you export a document, page layout carries over as follows:
| Format | Page layout |
|---|---|
| Word (.docx) | Everything on this page is written as Word page setup. That includes sections and both break types, columns, and first-page and even-page headers and footers. Page number formats and restarts, borders, line numbers, hyphenation, the watermark, and the paragraph pagination options carry over too. |
| Pages match the editor: the same page breaks, columns, headers, footers, page numbers, borders, watermark, and line numbers. A pageless document is exported as pages. | |
| HTML, Markdown, plain text | No pages. Headers, footers, and page numbers are left out. |
Opening a Word file brings its page setup into Revise. What is shown, kept, or changed is listed in Word compatibility.
Requirements and limits
| Item | Limit |
|---|---|
| Changing layout | Not available in documents you can only view |
| Set as Default | Requires an account |
| Margins | 0 to 3 in per side |
| Columns | 1 to 3 per section, equal width |
| Page number start | 1 to 99999 |
| Section break types | Next page and continuous. Word's even-page and odd-page breaks are shown as next-page breaks. |
| Even-page headers and footers | From Word or the agent only; not editable in the dialog |